前回M5Stack BASIC単体でWEBラジオを鳴らすところまで行きましたが、やはり内蔵スピーカーでは音質的に音楽を聴くという感じではなかったので、外付けのMP3デコーダを使って聴く形に変更することにしました。
どのデコーダを使用するか?
M5StackとMP3再生などで検索すると、VS1053Bというチップを搭載したデコーダボードを利用している人が多そうだったので、この情報を元に更に検索してみることにしました。
VS1053BはVLSI Solution Oy製のMP3デコーダチップで他にもVS1063、VS1003、VS1103、VS1011等のシリーズが展開されているようです。
この中からデコーダボードになっている(チップ単体ではなく基板に実装されている)もので、安いものを探しVS1003を使用することにしました。


ライブラリの追加
前回使用したESP8266Audioというライブラリー
github.com
をゴニョゴニョしてみたところ知識不足で上手く鳴らずだったので、VS1003との接続方法から見直しすることに。
VS1053のライブラリと書いてあったのですが、SPI通信が出来ていれば大丈夫だろうということで以下のライブラリを試してみることにしました。
github.com
※Exampleフォルダ内にWebRadioDemoというサンプルが入っており、その中に結線が記載されていたため参考にさせて頂きました
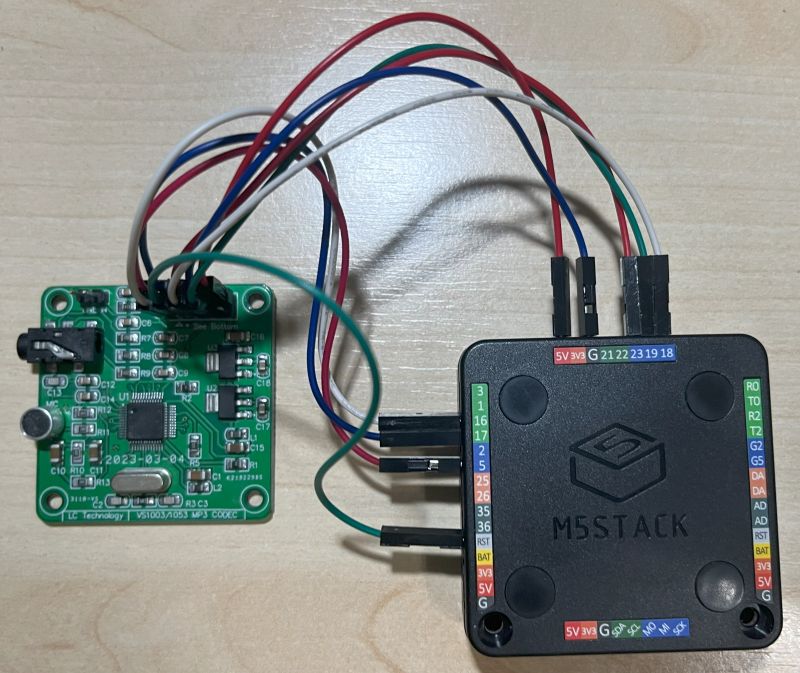
M5StackとVS1003ボードとの接続
以下のピン同士を結線しました
VS1003 → M5StackBASIC
- 5V → 5V
- DGND → GND
- MISO → 19
- MOSI → 23
- SCK → 18
- DREQ → 17
- XRST → RST
- XCS → 5
- XDCS → 16
サンプルスケッチの変更
上記のライブラリ内のサンプル、WebRadioDemoを変更していくことにします。
  /**
  A simple stream handler to play web radio stations using ESP8266

  Copyright (C) 2018 Vince Gellár (github.com/vincegellar)
  Licensed under GNU GPL v3

  Wiring:
  --------------------------------
  | VS1053  | ESP8266 |  ESP32   |
  --------------------------------
  |   SCK   |   D5    |   IO18   |
  |   MISO  |   D6    |   IO19   |
  |   MOSI  |   D7    |   IO23   |
  |   XRST  |   RST   |   EN     |
  |   CS    |   D1    |   IO5    |
  |   DCS   |   D0    |   IO16   |
  |   DREQ  |   D3    |   IO4    |
  |   5V    |   5V    |   5V     |
  |   GND   |   GND   |   GND    |
  --------------------------------

  Dependencies:
  -VS1053 library by baldram (https://github.com/baldram/ESP_VS1053_Library)
  -ESP8266Wifi/WiFi

  To run this example define the platformio.ini as below.

  [env:nodemcuv2]
  platform = espressif8266
  board = nodemcuv2
  framework = arduino
  build_flags = -D PIO_FRAMEWORK_ARDUINO_LWIP2_HIGHER_BANDWIDTH
  lib_deps =
    ESP_VS1053_Library

  [env:esp32dev]
  platform = espressif32
  board = esp32dev
  framework = arduino
  lib_deps =
    ESP_VS1053_Library

  Instructions:
  -Build the hardware
    (please find an additional description and Fritzing's schematic here:
     https://github.com/vincegellar/Simple-Radio-Node#wiring)
  -Set the station in this file
  -Upload the program

  IDE Settings (Tools):
  -IwIP Variant: v1.4 Higher Bandwidth
  -CPU Frequency: 160Hz
*/

#include <VS1053Driver.h>

//M5Stackでの動作
#include <M5Stack.h>

#define UNDEFINED    -1
#ifdef ARDUINO_ARCH_ESP8266
#include <ESP8266WiFi.h>
#define VS1053_CS     D1
#define VS1053_DCS    D0
#define VS1053_DREQ   D3
#endif

#ifdef ARDUINO_ARCH_ESP32
#include <WiFi.h>
#define VS1053_CS     5
#define VS1053_DCS    16
#define VS1053_DREQ   17
#endif

// Default volume
#define VOLUME  70

VS1053 player(VS1053_CS, VS1053_DCS, VS1053_DREQ, UNDEFINED, SPI);
WiFiClient client;

// WiFi settings example, substitute your own
const char *ssid = "TP-Link";
const char *password = "xxxxxxxx";

//  http://ais-edge89-dal02.cdnstream.com/b76353_128mp3
const char *host = "ais-edge89-dal02.cdnstream.com";
const char *path = "/b76353_128mp3";
int httpPort = 80;

// The buffer size 64 seems to be optimal. At 32 and 128 the sound might be brassy.
uint8_t mp3buff[64];

void setup() {
    M5.begin();                 // 本体初期化
    M5.Lcd.begin();             // 画面初期化
    delay(1000);
    M5.Lcd.setTextSize(2);
    M5.Lcd.println("VS1003 WEB Radio");

    Serial.begin(115200);

    // Wait for VS1053 and PAM8403 to power up
    // otherwise the system might not start up correctly
    delay(3000);

    // This can be set in the IDE no need for ext library
    // system_update_cpu_freq(160);

    //M5.Lcd.println("\nSimple Radio Node WiFi Radio");

    SPI.begin();
    player.beginOutput();
    player.setVolume(VOLUME);

    M5.Lcd.print("Connecting to SSID ");
    M5.Lcd.println(ssid);
    WiFi.begin(ssid, password);

    while (WiFi.status() != WL_CONNECTED) {
        delay(500);
        Serial.print(".");
    }

    M5.Lcd.println("WiFi connected");
    M5.Lcd.print("IP address: ");
    M5.Lcd.println(WiFi.localIP());

    M5.Lcd.print("connecting to ");
    M5.Lcd.println(host);

    if (!client.connect(host, httpPort)) {
        M5.Lcd.println("Connection failed");
        return;
    }

    M5.Lcd.print("Requesting stream: ");
    M5.Lcd.println(path);

    client.print(String("GET ") + path + " HTTP/1.1\r\n" +
                 "Host: " + host + "\r\n" +
                 "Connection: close\r\n\r\n");
}

void loop() {
    if (!client.connected()) {
        Serial.println("Reconnecting...");
        if (client.connect(host, httpPort)) {
            M5.Lcd.print(String("GET ") + path + " HTTP/1.1\r\n" +
                         "Host: " + host + "\r\n" +
                         "Connection: close\r\n\r\n");
        }
    }

    if (client.available() > 0) {
        // The buffer size 64 seems to be optimal. At 32 and 128 the sound might be brassy.
        uint8_t bytesread = client.read(mp3buff, 64);
        player.playChunk(mp3buff, bytesread);
    }
}
元のサンプルではESP32用の内容になっており進捗状況がわからないので、LCD上へどこまで処理が進んだのかわかるようにSerial.printをM5.Lcd.printに変更して表示されるようにしています。
動作確認
上記でコンパイル→ボードに書き込み、VS1003ボード上の3.5mmイヤホンジャックにスピーカーを接続したところ、無事WEBラジオを聞くことができました。
音質についてもPCやスマホで聴くのと同様のレベルで、途中で止まるようなこともなく電源を入れたらすぐにラジオが聞けるようになりました。

今後について
今後は複数のラジオ局のボタンでの選択(SDカードからの読み込みで追加削除が可能)、音量調整、メタデータとして配信される楽曲名やアーティスト名の表示等も機能追加していければと考えています。
ハード的にも基板サイズが43mm*43mmでスタックできるので、M-BUSピンにて重ねて使えるようにするのも良いかもしれません。